Need to Pinpoint Hydraulic System Issues? Follow This Troubleshooting Checklist
Hydraulic system failures don’t come out of the blue. They often come after common symptoms, such as a gradual or sudden loss of pressure, arise.
Any major component (pump, relief valve, directional valve, cylinder) may be to blame. By following a step-by-step testing procedure, the origin of the problem can be traced.With a little troubleshooting, failures can be avoided.
Where to Start the Process
We recommend consulting the Surplus Center’s Fluid Power Data Book, which is a condensed collection of useful fluid power data and references available for sale at surpluscenter.com.The guide offers troubleshooting in eight steps, starting with inspecting and testing pumps, valves, and other components to trace the problem back to a component. Then, it offers advice on how to disassemble, troubleshoot, and reassemble or replace parts.
We have condensed these procedures into three steps focusing on pump issues, but the same steps can be applied to troubleshooting valves and motors.
Step 1: Inspect Fluid and Pump Suction Strainer
Important Note: Before inspecting, the hydraulic system should be at normal operating temperature (about 100 degrees F).Hydraulic system problems encountered most often is cavitation of the hydraulic pump inlet caused by restriction due to a dirt build-up on the suction strainer. This can happen on a new as well as an older system.
A clogged suction strainer generally produces the following symptoms:
- Increased pump noise
- Loss of pressure and/or speed
- Loss of flow
- Check fluid levels: Ensure that the hydraulic reservoir is properly filled. Low fluid levels can cause cavitation, leading to air being drawn into the pump.
- Examine fluid quality: The fluid should be clean, clear, and free from contaminants. Dark, milky, or foamy fluid indicates oxidation, air entrapment, or water contamination.
- Inspect the pump suction strainer: The suction strainer is located at the pump’s inlet to prevent debris from entering and damaging the pump. If the strainer is clogged, it can starve the pump of fluid, causing cavitation and reduced performance. Remove the suction strainer and inspect it for blockages. Clean or replace it if necessary. Ensure that no contaminants are reintroduced when reinstalling.
- Look for leaks: Visually inspect the pump, hoses, and fittings for any signs of leakage. External leaks may point to damaged seals, cracked hoses, or loose connections.
Step 2: Pump and Relief Valve Testing
Once the initial inspections are complete, test the pump to ensure it’s delivering fluid as expected.- Check for unusual noises: Loud whining or knocking noises are often the result of cavitation or air being drawn into the system due to a clogged suction strainer or low fluid levels.
- Monitor system pressure: Use a pressure gauge to ensure the pump is delivering proper pressure. Low pressure output may indicate internal wear, incorrect settings, or issues with fluid flow.
- Feel for overheating: Overheating often results from internal friction due to fluid contamination, misalignment, or insufficient lubrication. Addressing these issues promptly can prevent pump failure.
Next, consider these four common pump problems and their solutions:
1. Pump is not delivering pressure
- Possible causes: Worn pump components, clogged pump suction strainer, or incorrect pressure settings.
- Solution: Clean or replace the suction strainer if clogged, inspect internal pump components for wear, and verify the settings on the pressure relief valve.
2. Pump cavitation
- Possible causes: Low fluid levels, a blocked suction strainer, or restricted inlet lines.
- Solution: Ensure fluid levels are correct, clean the suction strainer, and inspect the inlet line for any restrictions or collapsed hoses.
3. Pump overheating
- Possible causes: Contaminated fluid, insufficient cooling, or over-pressurization.
- Solution: Change or filter the hydraulic fluid, inspect the system’s cooling mechanisms, and verify that pressures are within pump specifications.
4. Noisy pump operation
- Possible causes: Air in the system or worn internal parts.
- Solution: Check for loose fittings or damaged seals that may be introducing air into the system and replace any worn internal components.
Step 3: Internal Pump Inspections and Reassembly
If basic troubleshooting doesn't solve the issue, disassembling the pump may be necessary to inspect for internal damage.- Inspect the pump suction strainer: If you haven’t already, inspect the strainer again for any accumulated debris or blockages.
- Check rotors and bearings: Look for signs of wear or scoring that could reduce the pump’s ability to generate pressure efficiently.
- Inspect seals: Damaged seals can allow fluid leaks or air to enter the system, affecting pump performance. Replace worn seals and O-rings as needed.
- Recheck pressure output: Ensure the pump is delivering proper pressure, and use a pressure gauge to monitor its performance.
- Listen for abnormal noises: If unusual noises persist, there may still be air trapped in the system, or additional parts may need attention.
- Verify fluid cleanliness: Make sure the fluid remains clean and at the proper level after reassembly to ensure smooth operation.
By starting with fluid levels and quality, examining the pump suction strainer for blockages, and listening for unusual sounds, you can identify and resolve most hydraulic pump issues. If internal damage is found, repair or replace components as needed.
Hydraulic Parts Source is a leading fluid power remanufacturer, and we’re ready to serve you. Contact us today to discuss forming an alliance by calling (866) 985-8401 or get a quote by emailing sales@hydparts.com.
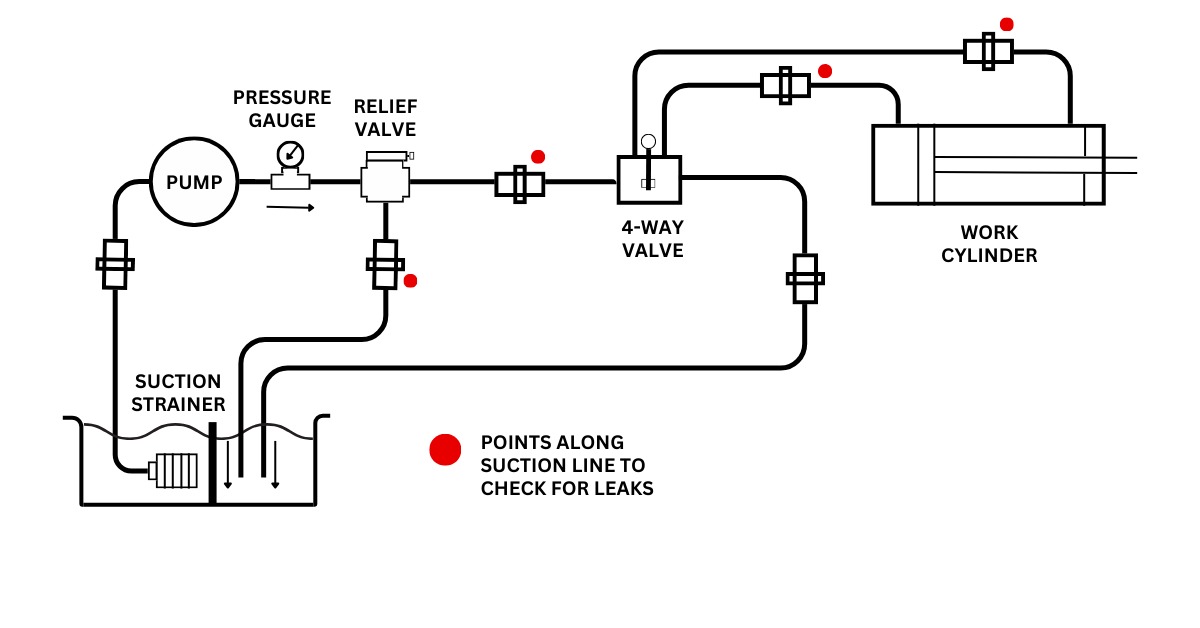
Figure 1: Problem areas to inspect while troubleshooting
Tags
Posts
2024
August
2023
Need a Quality Supplier? HPS Checks All the Marks
[08/29/24 04:12 PM]
Digitization & Hydraulics
[08/29/24 03:45 PM]
May
Hydraulic System Troubleshooting: Step-By-Step
[05/23/24 01:38 PM]
Downloadable Resources for Distributors
[05/01/24 11:28 AM]
April
February
Meet Our New Hydraulic Test Stand: Part 2
[02/15/24 02:50 PM]
Remanufacturing Benefits for End-Users
[02/01/24 03:04 PM]
January
December
2022
Hydraulic Systems and Their Components: An Overview
[12/20/23 12:27 PM]
Overfilling Hydraulic Fluid Can Cause Issues, Too
[12/08/23 01:18 PM]
November
Branded Gifts for Commuting Hydraulics Clients
[11/09/23 08:41 PM]
Diagnosing Pump Problems on Construction Equipment
[11/08/23 01:42 PM]
October
The Useful Complexity of Proportional Control Valves
[10/25/23 09:11 PM]
FAQs: Let’s Talk About Hydraulic Pumps
[10/23/23 08:25 AM]
Hydraulics System Corrosion FAQs
[10/11/23 01:00 PM]
September
August
5 Ways Inside Reps Can Boost Hydraulics Sales
[08/13/23 03:54 PM]
Positive Displacement Pump FAQs: How Do Hydraulic Vane and Gear Pumps Work?
[08/10/23 06:15 PM]
The Value of Hydraulic Pressure Relief Valves
[08/02/23 05:26 PM]
July
June
May
Hydraulic Parts Source is So Much More Than Pumps, Valves, and Motors
[05/30/23 12:09 PM]
How Does a Hydrostatic Pump Work?
[05/15/23 11:07 AM]
April
How Do Directional Control Valves Work?
[04/27/23 10:37 AM]
From Valves to Motion: Knowing How a Cylinder Works to Move a Hydraulic System
[04/14/23 10:23 AM]
March
HPS Troubleshooting Tactics: Common Hydraulic Valve Issues
[03/15/23 10:47 AM]
What Happens When Hydraulic Parts Suppliers & Distributors Join Forces?
[03/15/23 10:04 AM]
February
January
December
November
October
September
August
July
June
2021
Denison’s Innovative Beginnings Show Through in Quality, Flexible Parts
[06/20/22 06:38 PM]
Our Products: Get to Know True Blue Vickers
[06/06/22 06:30 PM]
May
Pascal’s Principle and the Origin of Hydraulics
[05/31/22 06:25 PM]
Avoiding Devastating Cavitation Damage
[05/03/22 06:16 PM]
April
Hydraulic Parts: How to Make Green Choices
[04/18/22 06:09 PM]
Hydraulic System Hazards: Avoiding Safety Issues from the Beginning
[04/05/22 05:58 PM]
March
Motors 101: Hydraulics at Work
[03/21/22 07:00 PM]
Valves 101: It’s All About Control - and Some Other Need-to-Know Facts
[03/07/22 06:53 PM]
February
January
December
November
2020
Promotional Gift Ideas for Fluid Power Distributors to Unwrap Marketing Potential
[11/29/21 10:00 AM]
Need-to-Know Fluid Power Facts: The 5 W's of Hydraulic Oil Viscosity
[11/29/21 09:32 AM]
How to Close the Sales Gap & Increase Revenue: Part 2
[11/08/21 08:06 PM]
October
September
August
July
June
Change Filter Elements to Avoid a Hydraulic System Nightmare
[06/07/21 05:02 PM]
5 Sources of Hydraulic Fluid Contamination (and How to Address Them)
[06/01/21 04:09 PM]
April
How to Win Back Lost Customers: 5 Steps for Fluid Power Distributors
[04/19/21 04:03 PM]
7 Outside Sales Strategies to Drive Fluid Power Revenue
[04/05/21 03:54 PM]
March
4 Reasons Fluid Power Distributors Should Consider Promotional Gifts
[03/16/21 03:48 PM]
Hydraulic System Corrosion: 3 Causes & 6 Prevention Tips
[03/10/21 03:42 PM]
February
Setting and Troubleshooting Relief Valves in Hydraulic Systems
[02/23/21 03:36 PM]
When & How to Replace a Hydraulic Pump Hose Assembly
[02/08/21 03:26 PM]
January
December
3 Directional Control Valve Problems & Fixes
[12/15/20 12:22 PM]
3 Ways to Align a Hydraulic Pump
[12/01/20 12:15 PM]
November
Why Are My Hydraulic Seals Failing? 6 Common Causes
[11/16/20 12:09 PM]
8 End-User Tips for Choosing a Hydraulic Fluid Power Products Distributor
[11/02/20 12:05 PM]
October
September
8 Checks for Restarting Hydraulic Pumps After Long Shutoff
[09/29/20 11:45 AM]
6 Key Hydraulic Product Distributor Strengths
[09/21/20 11:38 AM]
8 Things to Check When Your Hydraulic Pump Stops Flowing
[09/01/20 09:47 AM]
August
3 Common Causes of Noisy Pumps and What to Check
[08/17/20 09:34 AM]
Old Cores: The Key to New Revenue for Fluid Power Distributors
[08/03/20 09:01 AM]
May